Hi everybody,
Hope you all are having a wonderful and creative day.
Life has been pretty crazy lately and I've been toying around with the idea of changing my blog. I've been thinking that I need a blog that more suits my creative projects and process.
So I dove right in. Here is the link to the new blog, Confessions of a Caffeinated Crafter.
I have already begun posting there and I've got a few interesting projects going on. I won't be posting here any longer, so for the followers that I have, please start following my new blog.
Take care and I look forward to hearing from you all,
Jodie
May 13, 2014
July 13, 2013
Glacier Bay
Hi everyone,
Rob and I can't believe that it's been 2 months since we went to Alaska. Where does the time go? Being in the middle of the dog days of summer, I personally REALLY miss Alaska's cool breezes and fresh air feel. With that being said, here are the pages that I did for when we visited Glacier Bay. This is the first side...
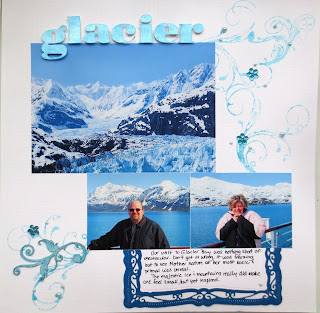 I didn't want a lot of background patterns to overwhelm the pictures so I decided to go with a white background. This was hard, one because working mostly with cards lately I had trouble locating plain 12x12 paper, and second because I love my pattern paper, it was tough not to use some.
The title I made by painting plain white cardstock with Sorbet Paint from Art Anthology that I bought at The Stamp Room. This stuff is awesome. It's a dimensional paint with lots of sparkle in it, what more could a girl ask for? lol So the next picture is a closeup of the details of the page.
I didn't want a lot of background patterns to overwhelm the pictures so I decided to go with a white background. This was hard, one because working mostly with cards lately I had trouble locating plain 12x12 paper, and second because I love my pattern paper, it was tough not to use some.
The title I made by painting plain white cardstock with Sorbet Paint from Art Anthology that I bought at The Stamp Room. This stuff is awesome. It's a dimensional paint with lots of sparkle in it, what more could a girl ask for? lol So the next picture is a closeup of the details of the page.
 I used the paint on a background stamp I had and made swirls peeking out from the photos. FYI remember to clean your stamps RIGHT AWAY if you're using paint on them, otherwise the stamps could be messed up permanently. I also used the Sorbet Paint on some chipboard pieces that added dimension to the page, then of course I had to add my bling. Here is the other side of the layout...
 I cut all the letters out using my Cricut Expression. If you are using thicker cardstock, remember to use a fairly new mat so that the paper will have good adhesion to the cutting mat.
Hope you enjoy the pages and get a few tips from them.
Take care and happy crafting - Jodie


Hope you enjoy the pages and get a few tips from them.
Take care and happy crafting - Jodie
July 11, 2013
Using Stencils
Hi everybody,
I've been feverishly working on our Alaska trip and am happy to say I am one and a half layouts away from being finished. I thought I'd start posting some of the finished pages with tips and tricks of the details I used. Here is the latest...
 If you've read my other posts you know that this album has been a challenge, just because the colors in the pics are not my usual color scheme, so paper with these colors have been in short supply. I have started using molding paste and stencils to give dimension to my work, so on the tag, I colored the paste with mica powder and used a new stencil I got...
 I first painted the tag with Twinkling H2Os, did some stamping with StazOn, then added the paste and let dry. The next photo shows how I used the new Tim Holtz Distress paints...
 I painted the Grungboard pieces with the paint, then stamped over it, once dry with the same color of ink pad as the paint. I wanted subtle texture and this worked out perfectly.
Thanks for visiting and be creative!
Take care - Jodie


Thanks for visiting and be creative!
Take care - Jodie
June 23, 2013
Twinkling H2O
Hi everyone,
As some of you may know, I've been taking an online class of sorts. It's called Camp Scrap and it's like a virtual camp for papercrafters. Each week there are new videos and challenges and all sorts of stuff.
Anyhoo, one of the challenges was to use a new product or one you haven't used in a while, so I broke out my Twinkling H2O.
 This Alaska album has been about modification. Modifying my papers and embellishments to better suit the colors of the pictures. In the above photo, I used the Twinks to change the color of the chipboard stickers, which worked great, because the glitter was still showing through, even after I painted them.
 To also add more interest and layering, I broke out my grungeboard accessories, and painted them with the Twinks as well...
 As you can also see in the above picture I painted green cardstock (which originally was the wrong green of course - lol) and cut out letters and strips of accent paper for the page.
 I think the final layout really came together well. I'd forgotten how great those little paints are!
 Hope everyone has a crafty day!


June 16, 2013
Checkin' In
Hi everyone,
I hope that you are enjoying your Sunday so far. I certainly am, but unfortunately it's going by too fast! LOL I just wanted to write a quick note that I'm still scrapbooking, but not creating a layout. How is she doing that you ask?
I'm actually sorting through all my digi pics and man what a task that has been. It has been cathartic though, weeding out the keeps and not keeps, plus reliving all the great memories that the photos are bringing back. I have started to read this new e-book (well it's new to me - LOL) called Photo Freedom and it's really reawakened my interest in scrapbooking again.
Part of the philosophy is getting out of the idea of having to scrap in chronological order, which for me is a challenge. But sorting my pics in a different way, has made me be interested in scrapbooking again.
Anyway, that's my shpeel for the day. Hope you a have a great rest of the weekend!
Take care - Jodie
June 13, 2013
WOW, 2 Posts in a Row
Hi everyone,
I'm really getting inspired to start more scrapbooking. It's partly due to the amazing photos of our Alaska trip, while the other part is due to this fun class I'm taking over at Big Picture Classes. This is a great site, not only do they have reasonably priced classes, but a selection of them are free. If you're a scrapbooker, you gotta check it out. Don't worry my stamps are still getting love. I just bought a bunch of great stamping stuff at my friend Kina's store The Stamproom. It's an online store and if you're in the Jacksonville, FL area, she'll probably have time for you to come over and shop! She has a wonderful selection of mixed media supplies, stamps and more! And no I'm not getting any kickbacks from these sites - LOL.
Anyhooo, onto today's post, I'm working on the Alaska album and here is one of the latest layouts... I've been having trouble matching the amazing greens and blues in these pics, so I decided to take matters into my own hands. As any crafter knows, I have a TON of paper and I just can't bear to buy anymore, so I made my own...
 The green paper is or I should say was a really, light pale green. I took a green ink pad that matched the pic better and inked up the paper. At first I used a Foam Applicator by Tim Holtz, but it wasn't giving me dark enough coverage, so I took the ink pad directly to the paper and used the applicator to spread out and smooth the ink. So at this point I just had green paper, so to add interest I added some background stamps in black Memento Ink. If you notice, I used the flowers that I made green as well. If you don't remember how I did, tune into yesterday's post. But I couldn't stop there because I wanted more green paper but with slightly different tones, so...
 The green here was originally white glossy paper. I broke out my Alcohol Inks by Ranger and went to town with their Felt Applicator, (OK so it's the same applicator, I just changed the pad!) I also added a touch of the copper alcohol ink. Remember a little of this goes a long way. So after all that, this is how it came together.
Hope everyone has great day and happy crafting!
The green here was originally white glossy paper. I broke out my Alcohol Inks by Ranger and went to town with their Felt Applicator, (OK so it's the same applicator, I just changed the pad!) I also added a touch of the copper alcohol ink. Remember a little of this goes a long way. So after all that, this is how it came together.
Hope everyone has great day and happy crafting!
Anyhooo, onto today's post, I'm working on the Alaska album and here is one of the latest layouts...


June 12, 2013
Fun in the Snow!
Been Awhile...
Hi everyone, it seems like I haven't posted in forever, but looking at the date of the last post, I guess that's the truth! LOL Just to give a few details about what's been going on...
Folks came down in November for 2 weeks and we had a blast. If you go to my Facebook page pics are posted with more to follow.
I made it through the Christmas season and inventory at Hobby Lobby, which was crazy busy and stressful! Work has calmed down a bit, but I'm thinking about a career move, more on that to follow.
Then finally Rob and I went on an Alaskan cruise for a week, to celebrate Rob's birthday, the big 50! It was amazing and it's working on this album that has brought me to today's post. Out of all the paper I've got, the pics are this amazing blue and green, and I just don't seem to have the right color of paper in either cardstock or print paper. I'm having to improvise. Of course this applies to my embellishments so...
This first pic is a comparison of where my flowers started and where they ended up. They started as pale pink, salmon, yellow etc. and ended up this amazing forest green with gold highlights. Here are the tools that I used. I used Pinta alcohol ink but you could easily use the Tim Holtz Alcohol Inks. The Lumiere paint I added with my finger. The paint is a hunter green with gold highlights, which are what I wanted to pop out from the flower.
 Here are the final results...

This first pic is a comparison of where my flowers started and where they ended up. They started as pale pink, salmon, yellow etc. and ended up this amazing forest green with gold highlights.


Subscribe to:
Posts (Atom)